Coolant leaks can develop over time and go unnoticed if owners don’t regularly inspect fluid levels. Even small leaks that allow coolant to slowly escape can pose problems if not addressed promptly. Once a leak begins, it can worsen and lead to costly overheating issues or damage.
That’s why it’s critical to be able to identify the signs of a coolant leak early. Identifying and repairing a minor drip or seepage is inexpensive as compared to a blown head gasket or cracked engine block from operating with insufficient coolant over long periods.
In this article, we will outline the key causes and symptoms of coolant leaks and eventually, you will learn all the temporary to permanent fixes of coolant leaking. Additionally, most importantly we will guide you in identifying the coolant leak symptoms and the source of the leak of antifreeze.
Signs of a Coolant Leak
Here are some common coolant leak symptoms that are mostly found in an overheated car:
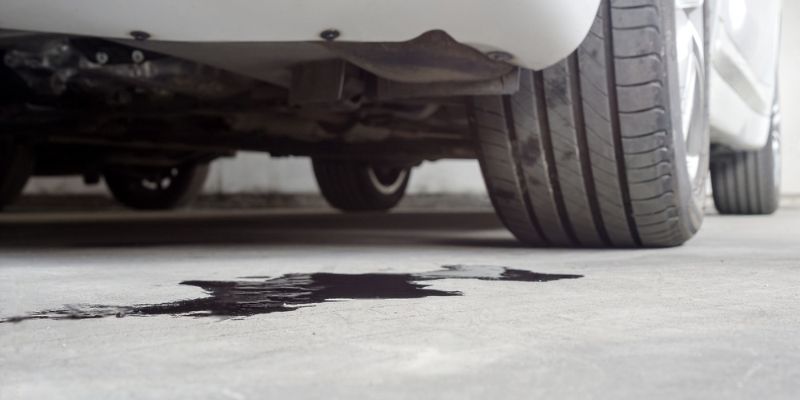
1. Visible Coolant Puddles
One obvious sign of a coolant leak is the presence of puddles underneath your vehicle. As coolant seeps or drips from its system, it will pool on the ground below. You may notice light green or orange puddles near areas like the radiator, water pump, hoses, or other components.
It’s a good practice to check under the hood and undercarriage periodically for any fresh fluid accumulation.
2. Overheating Engine Check Light
An overheating engine is an obvious symptom of a coolant leak and a serious issue that requires prompt attention. The engine’s cooling system acts like your body’s circulatory system, keeping it from overheating with a continuous flow of coolant.
When this lifeline of coolant is lost due to a leak, the engine loses its defense against high temperatures. Even a slow, gradual leak left unaddressed can eventually lead to overheating as fluid levels decrease over time.
Overheating brings the serious risk of internal damage from extreme heat. Warping pistons or a melted head gasket could mean costly repairs.
3. Sweet Smell in the Cabin
One significant sign that a coolant leak may be occurring is a sweet smell noticeable inside the vehicle’s cabin. This is because ethylene glycol, the main ingredient in automotive coolant, has a distinctly sweet odor.
If coolant is leaking externally but also penetrating the HVAC system, its smell can be circulated through the vents and into the passenger area.
The leak point could be at the radiator, a hose, a water pump, or another cooling system component. From that point forward, residual antifreeze can infiltrate the vehicle’s ventilation system.
Also Read: 6 Best Antifreeze for Older Cars
4. Low Coolant Level
Lower coolant level is another common symptom of a potential coolant leak issue. If there is a leak somewhere in the hoses or other components, coolant will naturally start to disappear over time.
Even a small drip here and there that escapes can add up with regular driving. The reservoir tank level will slowly go down when it’s not being regularly topped off.
By keeping driving your car when the coolant level is low, eventually results in the engine overheating and stalling while driving.
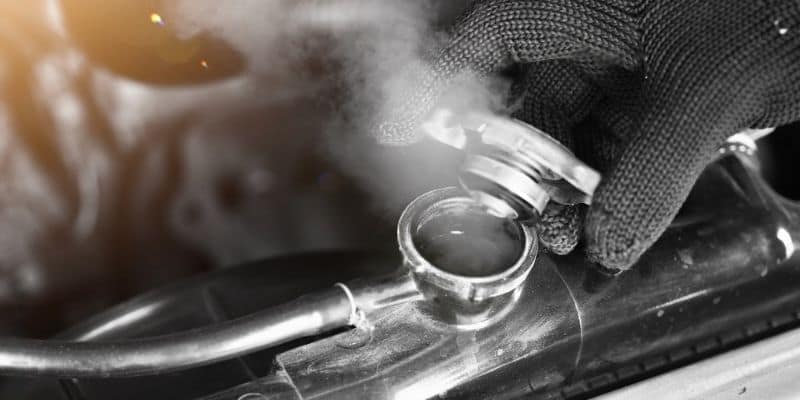
5. Steam from Engine Hood
One sign worth paying attention to is steam rising from under the hood and it confirms signs of leakage of radiator fluid and engine overheating.
We know coolant circulates through the engine to absorb excess heat. But if there’s a leak somewhere in the system, coolant levels can dwindle over time. Without adequate fluid, hot components won’t be cooled properly.
That’s where the steam comes in. On warmer days especially, you may notice mist or vapor wafting up from the front of the car every so often after shutting it off. This can indicate coolant is no longer doing its job moderating temperatures as it should.
It’s the coolant escaping as it boils off exposed hot surfaces without enough surrounding liquid to keep temperatures in check. Overheating issues down the road may follow if the leak isn’t addressed.

Causes of Coolant Leaking
1. Hose Damage
One common source of coolant leaks is damage to the rubber hoses that circulate the fluid throughout the engine cooling system.
Over time, frequent heating and cooling of the hoses as the engine is used can cause weak points to develop. Hoses may crack at places where they are clamped or routed near sharp edges. This is particularly an issue for older vehicles that have put high mileage on their original hoses.
Small animals like mice may also chew on hoses, leaving vulnerable holes in attempts to access the sweet-tasting coolant. Road debris occasionally flying up from the roadway has the potential to smash into exposed lower hose segments as well.
2. Loose Clamps
Loose hose clamps over the joints near the radiator, engine, and water pumps are also a potential cause of external coolant leaks.
Over numerous heat cycles, engine vibrations, and overall wear-and-tear, hose clamps can become loose. These important securing devices keep coolant hoses tightly attached to radiators, engines, water pumps, and other components.
The constant cycling of hot/cold coolant gradually widens any separation between the hose and fitting and becomes a source for the coolant to leak.
3. Cracked Radiator
One of the main components that can develop problems leading to coolant leaks is the cracked radiator.
Radiators are vulnerable to cracks developing over time due to normal thermal expansion/contraction cycling.
Rock and debris impacts during driving can sometimes fracture weak points in the radiator core or plastic end tanks.
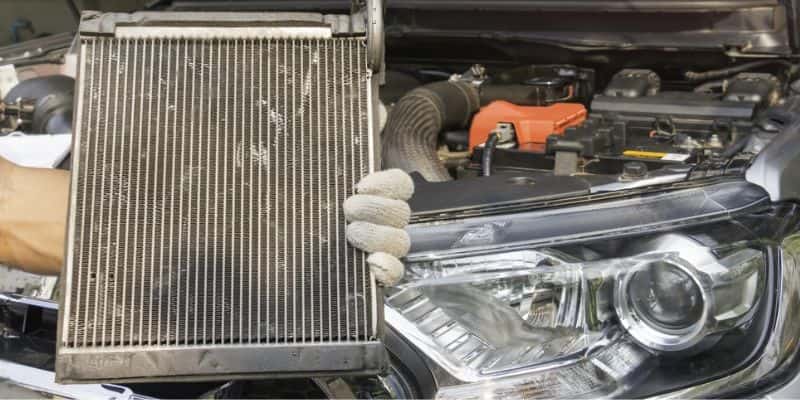
Signs of a cracked radiator include visible breaks or splits in materials, localized coolant dripping, and puddles near the bottom or sides.
Small cracks may only produce minor leaks initially. But they can expand larger while the engine is running hot and raising pressure.
Cracks left unaddressed mean coolant flow is compromised, reducing heat dissipation ability.
4. Failed Head Gasket
One important underlying cause of a mysterious coolant leak that should be checked for is a failed head gasket. As a crucial sealing component between the engine block and cylinder head, the head gasket endures high temperatures from normal engine operation.
Over time, the constant heating and cooling can degrade the gasket material through heat cycling. When weakened, the gasket may start to fail and no longer properly seal. This allows coolant to potentially mix with engine oil or seep into the combustion chambers.
As coolant leaks from the engine, it will pool underneath or drip from hoses and connections.
5. Corrosion in the Cooling System
Over time, corrosion can develop in a vehicle’s cooling system and lead to fluid leaks. The coolant acts as a protective rust inhibitor, but its effectiveness decreases with age.
If the coolant has not been drained and replaced according to the manufacturer’s maintenance schedule, corrosion can form on internal metal components like cylinders, radiators, water pumps, and even hoses.
As corrosion eats away at the material, it can cause very small cracks and holes to form. While minor at first, vibration from engine operation ends in the form of cracks and eventually becomes the source of coolant loss.
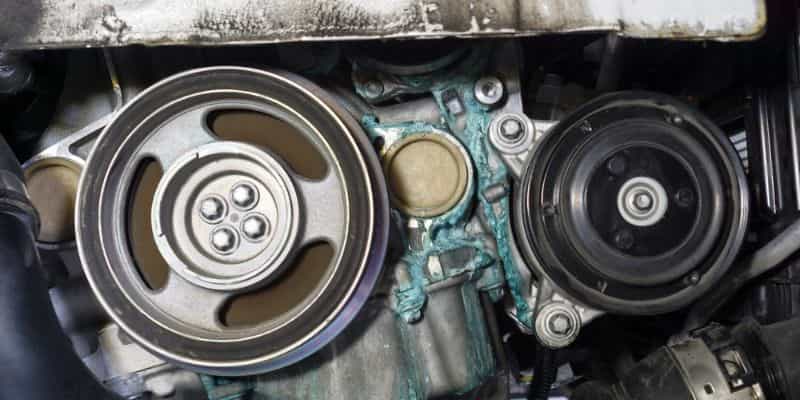
6. Worn Out Water Pump
Here are a few ways a worn/failing water pump can cause coolant loss:
- Water pumps contain mechanical seals that separate the coolant from other internal components like bearings. Over time, these seals wear out.
- As the seals fail, it allows coolant to gradually seep past them. This causes minor leaks initially that worsen over time.
- The leaking coolant may drip from the front or rear of the water pump housing where the hoses connect. Puddles will form underneath.
Consequences of neglecting a coolant leak
Here are the main consequences of neglecting a coolant leak:
Overheating
Without sufficient coolant, the engine will not be able to regulate its temperature properly. It will start to overheat even during normal operation.
Head gasket failure
Prolonged overheating can cause the head gasket, which seals the engine block and cylinder head, to warp and fail. This allows combustion gasses and coolant to mix.
Cracked engine blocks/heads
If overheating occurs repeatedly due to a coolant leak, it can cause cracks to form in critical engine components like the block or cylinder heads.
Warped valves/pistons
Extreme heat can deform or warp delicate internal engine parts like valves and pistons, necessitating their replacement.
Loss of power
As a hot engine is deprived of coolant, its components expand, and increased friction results in reduced power output.
Premature engine wear
Overheating accelerates the general wear of engine parts and can reduce the lifespan of the entire engine.
Potential fire
In severe overheating situations, localized engine fires can occur due to heat and spilled flammable fluids.
The longer a coolant leak goes without repair, the more likely more expensive engine damage will result from overheating failures. It’s important to catch leaks early.
How To Find A Coolant Leak? Identification
1. Inspecting the Radiator
Here is a step-by-step guide to finding a coolant leak by inspecting the radiator:
- Look at the front and rear of the radiator core as well as the side tanks. Inspect all surfaces closely for any signs of staining, wetness, or puddle formations.
- Place a mirror underneath the radiator if needed to get a better view. Fresh coolant leaks will be obvious as bright green or orange drips and marks against the black radiator material.
- Run your fingers along seams and joints between the plastic end tanks and aluminum core fins. Feel for any raised or creased areas that indicate cracking.
- Gently squeeze the upper and lower radiator hoses while someone inspects the radiator connections. This creates pressure to expose small pinhole leaks at hose ends or clamped joints.
- Clean the entire radiator surface with a degreaser if old stains make fresh leaks difficult to distinguish. Let it dry completely before inspecting under better lighting.
- Check that all visible radiator mounting bolts and fasteners are tight. Looseness can cause cracking from stress or small leaks past rubber grommets.
- Inspect any visible holes or openings in the radiator, like those for the temperature sensor or reserve tank tube.
2. Checking the Radiator Cap
Here are some steps to find a coolant leak by checking the radiator cap:
- Inspect the radiator cap closely while it is off the radiator. Look for any signs of cracking or damage that could cause leaks.
- Check that the rubber sealing surfaces and clamp edges look intact with no splits or punctures. A faulty cap won’t maintain proper system pressure.
- Gently pull the vacuum and pressure valves to ensure they move freely without binding. Corrosion could jam them and prevent the cap from sealing correctly.
- Perform a pressure test on the cap if possible. Apply 15 psi and ensure it holds steady for at least 15 seconds without losing pressure.
- Coat the sealing surfaces of the cap with a coolant leak-detection dye. Replace it and monitor nearby hoses and components.
- Rev the engine, then inspect the underside of the radiator cap while still warm. Leaking dye may be visible around the cap threads or underside.
- Inspect the area under where the cap sits after driving when fully warmed up. Leaking coolant may drip from a failed cap seal.
Checking radiator cap integrity is important as a failed seal can silently cause coolant and pressure losses over time.
3. Examining the Water Pump
We can find the cause of leakage by examining the water pump as:
- Inspect the front and back of the water pump housing for any signs of coolant stains or spots. Fresh leaks will be evident.
- Shine a flashlight inside the belt area for a clear view of all pump surfaces and housing joints.
- Gently squeeze each hose connected to see if the pressure causes any seepage at the connections.
- Thoroughly clean the area with a degreaser if old deposits obscure new leaks.
- Check for cracks along housing joints and seams, indicating failed internal seals. Inspect mounting bolts and drive belt condition as well.
4. Cooling System Pressure test
Here is an overview of how performing a cooling system pressure test can help identify coolant leaks:
- First, drain the coolant from the system and thoroughly flush and clean all passages.
- Install pressure test equipment which includes sealing the radiator cap, gauge, and compressor to pressurize.
- Reattach all hoses and connections to ensure the entire system is sealed.
- Begin pressurizing the system, slowly pumping it up to the recommended PSI. Most systems are tested between 15-20 psi.
- Apply a tracer solution like dye or liquid detergent to exterior surfaces where leaks are suspected using a brush.
- As pressure builds, any hairline cracks or faulty seals will cause the tracer to bubble up, clearly showing the leak point.
- Inspect carefully as even small leaks may be exposed only under higher pressure conditions.
- Monitor gauge pressure to ensure steady readings and no unintended drops occur.
- Isolate the leak source by pressurizing sub-sections if needed via separate seals.
- Repair or replace any components found to leak upon depressurizing the system.
- Recharge with new coolant and bleed air from the system.
Effects of Coolant Leak on Engine Performance
Reduced Cooling Capacity
A coolant leak that lowers the overall cooling system capacity can negatively impact engine performance. The engine relies on the continuous circulation of coolant to transfer heat away from hot internal components like the cylinder head and block.
As coolant is lost due to a leak, there is less volume available to perform this critical heat exchange function.
With a reduced cooling capacity, certain areas of the engine may not receive sufficient coolant flow to adequately cool under heavy load conditions.
Over time, enduring excessive heat cycles leads to increased component wear as a result of repeated heat stress. In severe cases of major leaks draining the coolant level critically low, overheating damage can potentially become catastrophic.
Potential Engine Damage
The coolant keeps the engine from overheating as it circulates and absorbs all the excess heat, then sends it out of the radiator to cool off.
When coolant leaks out the parts like the pistons, cylinders, and head could get hotter than they’re meant to during driving. Over time, this extra heat takes a toll. The metals might expand differently than designed, causing small cracks.
Seals could harden up earlier.
Moving parts like the valves might not last as long before needing replacement either. In severe cases with major leaks, the temperature gauge might even shoot up to the red if you’re unlucky.
Then you risk a blown head gasket or warped head from overheating, which takes the engine out of action.
Increased Repair Costs
When coolant leaks go unaddressed, they can ultimately result in much higher repair bills down the road. Even a small leak that seems insignificant may slowly deplete the coolant over time. The extra heat puts added stress on critical components like the head gasket, cylinders, and valves.
A blown head gasket or cracked engine block will require major repair work that is easily avoided when small issues don’t escalate. Beyond core engine repairs, the excess heat cycling can deteriorate other components faster as well.
Hoses may crack, water pumps seize, and thermostats fail more quickly in a low coolant situation. Each additional replaced part multiplies the labor hours and costs.
Fixing a Coolant Leak
Tightening Loose Connections
Over time, vibration from engine operation can cause hose clamps and other connectors holding components like the water pump or thermostat housing to gradually work loose. A simple visual inspection can reveal connections that have gaps or are no longer forming a proper seal.
Rather than assuming a part needs replacement right away, it’s worth double-checking that all hose clamps are fully engaged and tight. The same goes for any bolted joints in the system. A leak caused by a barely loose nut or bolt could be solved with just a proper re-tightening.
Replacing Damaged Hoses
Hoses showing any sign of deterioration should be replaced, not just patches or sections. New OEM-quality hoses provide durable material formulated to last under ideal conditions.
Installation is relatively straightforward, requiring only removing clamps and cutting or twisting off the old hose before sliding the new hose into position.
Repairing a Leaking Radiator
If the source of coolant loss is traced to the radiator itself, repair or replacement may be necessary.
Radiators can develop small cracks or holes that allow coolant seepage over time. This involves carefully cleaning the outer tank surface to locate affected areas, and then applying a high-quality radiator sealant. The sealant is designed to penetrate minor flaws and harden into an airtight barrier.
Larger radiator punctures may require soldering or welding skills.
How to Prevent Coolant Leaks?
Here are some tips to prevent coolant leaks:
Inspect Regularly
Check coolant level and visually inspect hoses/connections monthly for signs of leaks or deterioration. Catching issues early prevents major leaks.
Maintain Proper Coolant
Only use premixed coolant and water concentrate properly in the coolant reservoir. Correct coolant protects against corrosion and freezing.
Replace Worn Components
Inspect hoses for cracking/bulging and replace them as needed, usually every 5 years. Also replace damaged gaskets, seals, and belts proactively.
Secure Connections
Ensure hose clamps, radiator caps, and drain plugs are properly tightened to prevent vibration issues. Re-tighten regularly.
Flush Cooling System
Flushing removes rust, scale, and other debris that can cause small cracks to form over time. Flush coolant every 30k miles or as recommended.
Use Supplements
Additives like radiators and hose conditioners can provide extra protection against corrosion and UV damage to hoses from sun exposure.
Address Overheating Quickly
If the engine ever overheats, identify the cause and make repairs immediately to prevent damage leading to future leaks.
Proactive care and maintenance are key to preventing coolant leaks before they can cause issues down the road. Regular inspection and component replacement help ensure a leak-proof cooling system.
DIY methods to temporarily fix a coolant leak
Here are some potential DIY methods that may be used to temporarily fix minor coolant leaks:
- Coolant stop leak additive – Adding a sealant additive to the coolant can sometimes clog tiny cracks or leaks temporarily. Not always reliable and is best for very small issues.
- Rubber seal dressing – Applying a rubber seal conditioner or dressing around hoses, gaskets, and seals may help to swell and temporarily seal minor cracks in hoses.
- Grease/Vaseline – Applying thick grease or petroleum jelly like Vaseline around a leak point can potentially block a minor leak for a short time. Best for external areas.
- Tightening clamps/bolts – Carefully tightening any hose clamps, radiator caps, or other connections housing the leak may stop a small external drip if parts have loosened over time.
- Coolant sealing paste – Specialty pastes contain sealants that can be applied directly onto a leak point to try and plug very minor holes or seams if accessible.
However, these are only temporary fixes – the component will still need proper repair or replacement for a permanent solution. And not advisable for major or multiple leaks that could risk overheating.
What are the risks of using these temporary fixes instead of getting a proper repair or replacement?
Here are some potential risks of relying only on temporary fixes rather than properly repairing or replacing the leaking component:
- Continued leakage – Temporary seals may not fully stop the leak and coolant loss could continue, leading to overheating issues over time.
- Temporary nature – Most temporary fixes only work for a limited period, often just days or weeks, before the leak resumes. Relying on them long-term causes coolant system damage.
- Masking underlying issue – By just sealing leaks, the root cause goes unaddressed and may worsen internal damage if a hose, gasket, etc. is degrading.
- Toxic leakage – Coolant that continues leaking onto hot engine parts or the ground poses toxicity risks to the environment, animals, etc.
- Overheating potential – Gradual coolant loss leads to inadequate circulation and cooling, raising risks of the engine dangerously overheating.
Risks of toxic coolant leakage
Here are some more details on the toxicity risks of coolant leakage:
- Coolant contains ethylene glycol, which is poisonous to humans, animals, and the environment. Even small amounts can be lethal if ingested.
- Leaking coolant may pool on the ground and be consumed by pets, and wildlife, or enter water sources through runoff. Ethylene glycol causes kidney failure in most animals.
- Human skin contact with coolant presents toxic and caustic risks as well. Absorption through cuts or the eyes could lead to systemic poisoning issues over time.
- Extended spillage areas expose workers and bystanders to inhalation hazards from coolant vapors as they leak or boil off cracked radiators/hoses. Vapors can irritate the lungs.
- Propylene glycol, another common coolant component, poses lower toxicity but is still an irritant that may trigger allergic reactions through skin contact.
- Large spills require hazardous material cleanup due to risks of groundwater contamination from leaked ethylene glycol seeping into soil. It does not readily break down.
FAQs About Coolant Leaks
What Should I Do if I Detect a Coolant Leak?
Inspect hoses, connections, and the radiator for signs of damage or seepage. Once located, address small leaks by tightening connections or replacing damaged parts. Major leaks require more repairs- don’t ignore any leaks, as overheating could result in costly engine damage.
Can I Drive with a Coolant Leak?
No, driving with a coolant leak is not recommended. It can lead to engine overheating, reduced performance, and potentially costly damage. It’s best to address the issue before driving the vehicle again.
Is Coolant Leak Repair Expensive?
The cost of repairing a coolant leak can vary depending on the source and severity but generally expect to pay $100-$500.
A minor leak from a loose hose clamp may only cost $100-200 to tighten.
Replacing a single hose is $150-300 usually.
A leaking radiator repairs start at $300-500 and replacement is around $500.
Major leaks requiring extensive labor and multiple parts could reach $1000+.
The longer a leak goes, the more extensive repairs are needed.
Conclusion
Coolant leaks can cause serious engine damage if not addressed promptly. As coolant circulation is essential for maintaining proper operating temperature, any loss of fluid from cracks, loose clamps, or deteriorated hoses reduces the system’s effectiveness.
Regular inspection allows small issues to be caught early, often involving inexpensive repairs like tightening connections.
However, larger leaks or ongoing coolant loss risks overheating the engine. This excess heat places significant strain on critical components. Driving with substantive leaks raises repair costs as more parts may be damaged.
Identifying the source and fixing leaks promptly helps prevent costly repairs down the road.

Hi, Michael Williams here. I have always loved everything with an engine. After earning my degree in automotive engineering, I spent 5 years testing vehicles for a major manufacturer in Illinois. Now I am using my technical skills to review the latest models online and help others troubleshoot their engine problems with effective solutions.