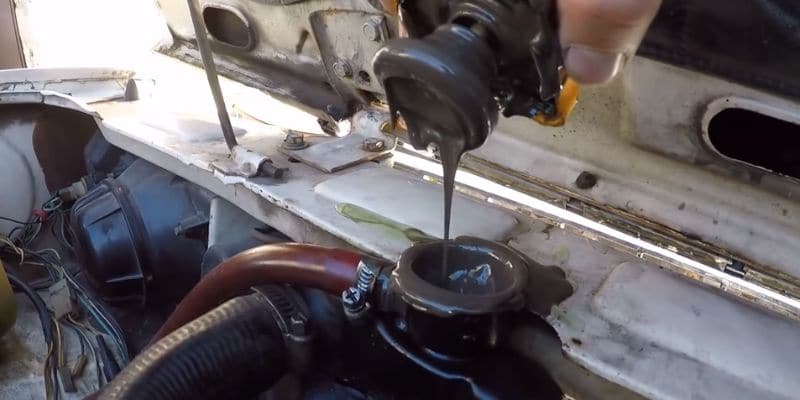
Has your coolant recently turned a murky brown color instead of the transparent green coolant it’s supposed to be? If so, then you likely have a dirty coolant issue on your hands.
A dirty coolant is a sign that sludge and sediment buildup is occurring inside your radiator and engine cooling system.
Dirty coolant cannot transfer heat efficiently when acting like thick chocolate milk instead of a clear liquid.
This article will guide you through all the primary symptoms of dirty coolant in your radiator. We’ll also discuss causes like poor maintenance, water problems, and coolant breakdown.
Additionally, we will also guide you on methods to fix dirty coolant with coolant flushing and other means.
What is Dirty Coolant?
Dirty coolant is a coolant that has become contaminated with suspended solids and sediment buildup over time. It forms through the gradual deposition of minerals, microscopic particles, oil fluid, and degraded rubber hoses into the coolant.
These contaminants swirl together into a sludgy soup. On their own, they may be microscopically small, but over time billions of particles thicken into a thick semi-solid slime.
What color is dirty coolant?
In short, dirty coolant appears murky, oily, or mud-brown rather than Crystal clear green. But dirty coolant can take on a variety of colors depending on the type and level of contamination present.
Here are some common coolant colors seen in dirty coolant:
- Brownish-gray – This muddy brownish-gray color is very common for dirty coolant that has a high amount of sludge, sediment, and rust particles suspended in them. The brown hue comes from rust residues interacting with other deposits over time.
- Dark Green – As coolant ages and breaks down, its original bright green color will darken. Coolant that has turned a dark, murky green has typically reached the end of its life and needs to be replaced.
- Brown – Coolant that has a distinct brown or tea color has generally been contaminated heavily with rust, usually from an iron or steel radiator. Significant corrosion is indicated by a brown coolant.
- Black – In very severe cases of extremely old or contaminated coolant, it can appear nearly black. This level of dirtiness means the cooling system is saturated with sludge, rust, and residues.
- Milky/Cloudy – If coolant takes on a milky-white appearance, it often means engine oil has mixed in, indicating a potential head gasket or crack issue allowing the two fluids to combine.
8 Causes of Dirty Coolant
To fix the dirty coolant issue, firstly, you will need to find the actual cause of coolant sludge forming. Here are some common causes of dirty coolant you need to check:
1. Lack of Coolant Maintenance
Driving without servicing or flushing the cooling system for extended periods allows residue and contaminants to build up over time. These deposits with time turn the coolant into sludge-like fluid.
2. Water Quality
Using tap water rather than distilled water in the system introduces mineral deposits that end up suspended in the coolant.
3. Coolant Age
As coolant ages, the additive package breaks down which can lead to increased deposits and corrosion within the cooling system.
4. Head Gasket Leaks
A blown head gasket allows combustion byproducts like oil and gases into the coolant, contaminating it.
5. External Leaks & Overheating
Small leaks or overheating events introduce air and atmosphere into a closed cooling system, promoting bacteria and residue accumulation.
6. Cooling System Damage
Cracks in radiators, pipes, or other components provide entry points for contamination from the outside environment.
7. Engine Issues
Problems like a cracked cylinder head or damaged water jacket can allow internal engine debris into coolant flow.
8. Poor Coolant Mixtures
Using tap water as a coolant or an improper glycol/water ratio dilutes the inhibitor package, reducing long-term protection.
Catching and addressing the root cause of dirt ingress is important to prevent further cooling system fouling over time.
7 Symptoms of Dirty Coolant
Here are some common symptoms of dirty coolant:
1. Cloudy Appearance
Dirty coolant will appear cloudy or milky rather than clear. Foreign particles suspended in the fluid scatter light, making it opaque. The level of cloudiness can indicate the severity of contamination.
2. Coolant Smell
If dirt contains bacteria or combustion gases are mixed in, the coolant may take on a characteristic burnt or foul odor. A strong chemical smell could also suggest that depleted additives are no longer protecting metals from corrosion.
3. Cooling Issues
Dirty coolant causes overheating problems as sludge inhibits fluid flow and coating reduces heat exchange. Caught early, it may only result in higher operating temperatures, but long term can damage internal components.
4. Engine Damage
Overheating from blocked cooling passages or inadequate protection can lead to issues like head gasket failure or cracking from excessive heat. More severe cases may require a costly engine rebuild.
5. Staining
Dirty particles may leave staining or deposits around the radiator cap, overflow reservoir, or exposed engine surfaces as dirty coolant evaporates. These residue trails can provide clues to the source of contamination.
6. Sludge Buildup
Dirt suspended in coolant can accumulate as sludge in engine passages, water pumps, and radiators over time, clogging flow. This restricts fluid movement and reduces cooling system efficiency.
7. Low Inhibitors
Loss of additives due to chemical breakdown or dilution makes coolant more susceptible to corrosion and deposits inside the system. Identifying depleted protection is an important warning sign.
Effects of Dirty Coolant on the Cooling System
Here are the effects of dirty coolant on a cooling system:
Reduced heat transfer ability
The sludge and deposits that accumulate coat critical surfaces needed for heat exchange. This thermal insulation decreases the radiator’s performance in rejecting heat to the air.
Restricted coolant flow
As residues build up over time in the water jacket passages, tubes, and narrow cooling galleries, they inhibit the coolant circulation around the engine. Less efficient flow equates to worse heat dissipation.
Accelerated corrosion
Contaminated coolant is less able to protect metals through the loss of corrosion inhibitors. Dirt exposure promotes rust and erosion inside ferrous components like cylinder heads.
Reduced radiator airflow
Clogged radiator fins and tubes hinder the flow of ambient air being pulled through during fan operation. This air is crucial to absorbing heat from the radiator surfaces.
Increased operating temperatures
With both heat transfer and fluid flow paths compromised, temperature regulation suffers and components end up running hotter than designed and end up in the form of the car stalling with coolant light on.
Water pump and hose wear
Abrasive particles in the coolant act like sandpaper on water pump seals and gaskets, accelerating their deterioration through mechanical wear.
Heater core clogging
Limescale and sediment collect over time inside the heater core and clog the heater core completely. It diminishes its ability to transmit heat into the car’s interior as intended.
How to Diagnose Dirty Coolant in the Radiator
Here are some methods to diagnose dirty coolant in the radiator. You can also diagnose these symptoms on your own and make up your mind if you can fix the dirty coolant issue by coolant flushing or going to the workshop.
Visual Inspection
Check for a cloudy, milky appearance compared to the new coolant which should be clear. Shine a bright light through the radiator inlet and outlet tubes to see sediment suspended in the fluid.
Pay attention to any localized deposits or staining that could indicate sludge buildup.
Coolant Test Strip
Chemical test strips compare to a color-coded chart to assess the glycol concentration level, pH balance, and presence of contaminants like oil or fuel in the coolant.
Reference the full array of indicators to detect any partial breakdown of additives protecting the system.
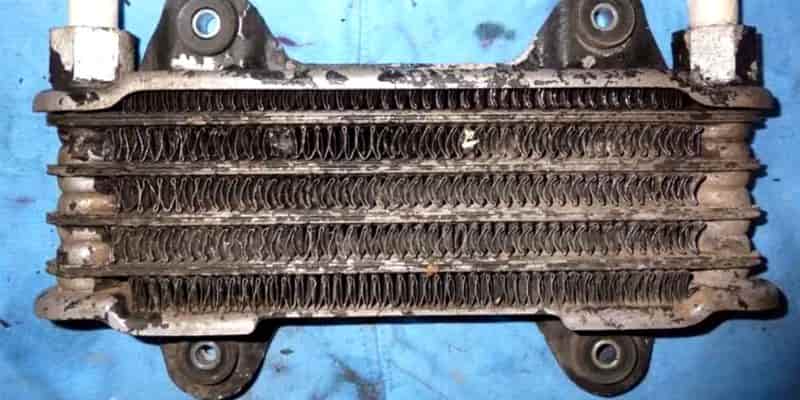
Radiator Removal
Physically removing the radiator allows for a direct visual inspection of both the exterior and interior cooling coil/core.
Deposits can be scraped off for analysis and identification of their source. Inspect the water neck, inlet, and outlet ports as well as where dirt may accumulate.
Pressure Test
Pressurizing and completely submersing the cooling system circuit in water checks for any air leaks from holes or cracks.
Pressure loss points to internal damage or corrosion, allowing environmental contaminants to enter the closed loop over time.
Fluid Analysis
Laboratory evaluation identifies any specific contamination types present through microscopic analysis or chemical testing.
Additional checks reveal byproducts from coolant additive or water breakdown as well as measurements of wear particulates that may be circulating mechanically within the engine.
Coolant Filter Inspection
If an external magnetic filtration system is installed, removal and examination will show any accumulated ferrous debris and the extent of buildup.
This reveals overall system cleanliness and timeline for recommended preventative coolant flushes.
How to Fix Dirty Coolant?
Coolant flushing is the most effective method to fix the dirty coolant issue if it is done with proper flushing fluid and through a flushing machine.
Here are the steps to fix a dirty coolant problem:
- Drain the coolant: Remove the radiator cap and drain the old coolant from the radiator and engine block. This removes the initial contaminants.
- Flush the system: Fill the system with a radiator flush solution and run the engine to circulate it. This helps break up and dissolve debris. Let it soak for a while before draining.
- Inspect components: Remove hoses, thermostats, and other parts to manually clean out any residue. Inspect for damage from overheating or corrosion. Replace worn parts.
- Flush again: Refill with water and repeat the flushing process to fully evacuate all remnants of dirty coolant and cleaning agents.
- Pressure test: Use a pressure cap and radiator tester to check for leaks from cracks or corrosion. Repair as needed.
- Use distilled water: Fill the system partially with distilled water which lacks minerals that lead to deposits.
- Add coolant conditioner: Add a bottle of coolant filter/conditioner to help remove microparticles during circulation.
- Top up with coolant: Fill to the proper level with new premixed antifreeze and water coolant to the reservoir.
- Check for leaks: Monitor for leaks during initial driving. Pulsing pressure may reveal new leak points.
- Maintain going forward: Follow the vehicle manufacturer’s service interval for coolant flushes to prevent recurrence.
Signs You Need a Radiator Flush
Here are some signs that the dirty coolant issue in your vehicle may require a full radiator flush:
You’ve been noticing signs that dirty coolant has been building up in your cooling system. Now it’s time to consider flushing it all out to restore proper functioning.
Some prominent signs it’s time for a radiator flush include:
- Cloudy, Discolored Coolant: As you’ve seen firsthand, the grime suspended in the coolant has made it dark and opaque rather than the bright green it should be.
- Overheating Issues: With heat transfer surfaces coated in sludge, it’s no wonder your car has been running hotter than usual. A flush can fix this.
- Smelly Coolant: Bacteria or other organisms thriving in the contaminated fluid have caused it to smell sour or foul.
- Deposits Around Radiator: You’ve spotted dried trails of residue and staining showing where dirty coolant has been circulating.
We have a full guide on coolant flushing that explains all professional and DIY methods to do coolant flush at home.
Why is My Coolant Dirty After Flush?
Here are some potential reasons why a radiator flush may not have fully resolved dirty coolant issues:
- Sludge residues remaining in the engine: Flakes of baked-on sludge can be difficult to remove and continue contaminating fresh coolant as it circulates.
- Skipped flushing heater core: This commonly overlooked component retains dirt that re-clouds coolant unless specifically flushed out.
- Inadequate flush duration/method: Simply draining and refilling may not sufficiently clear decades of caked deposits if the flushing solution wasn’t circulated long enough.
- Coolant filter not replaced: Accumulated biofilms and mineral scales in an external filter system gradually shed back into coolant over time.
- External leaks are unaddressed: Small seepage points from corroded pipes or gaskets are entry points for continued environmental contamination.
- Coolant type/quality inadequate: Using bad flush fluid, tap water diluent, or generic coolant lacks the protective additives of good brands.
Thorough flushing may require radiator removal, flushing machine circulation, and addressing factors like leaks, filters, or corrosion to fully resolve long-term coolant fouling at its source.
How Often Should You Flush Your Radiator?
Here are guidelines for how often you should flush your radiator:
- Every 2 years or 24,000 miles – This is a generally recommended interval for most vehicles. It helps remove mineral deposits and prevents corrosion.
- Every year or 12,000 miles – Driving in extremely hot/cold, dusty areas, or doing mostly short trips requires more frequent flushes.
- Every 30,000-60,000 miles – Newer cars with extended life coolant may only need flushes during routine maintenance in this higher mileage range.
- Anytime you replace the coolant – Draining and refilling the old coolant is a perfect time to flush sediment from the system.
- If you notice dirty coolant – A cloudy or rusty appearance indicates it’s time for a flush to restore clarity and prevent damage.
FAQs
Why Does Coolant Need to Be Flushed?
Over time, coolant picks up sediment and contaminants that reduce its effectiveness. A flush cleans out these deposits to restore heat transfer and corrosion protection.
What Are the Consequences of Neglecting Radiator Flush?
As sludge builds up over time, it blocks fluid flow through the radiator and water passages. This prevents efficient heat transfer, reduces engine performance, and engine overheating.
How to Choose the Right Coolant for Your Vehicle?
Check your owner’s manual for the recommended type of coolant. Use a premixed coolant that meets the specifications for your make and model in terms of pH balance, freeze protection level, and corrosion inhibitors.
Can Dirty Coolant Lead to Other Engine Problems?
Yes, dirty coolant can lead to overheating, which may cause cracked heads or blown gaskets. It also accelerates the internal rusting of components like the block and water pump. Poor thermal regulation impacts performance and fuel economy as well.
Is it OK to drive with dirty coolant?
No, it’s not recommended to drive with dirty coolant for long.
Driving with dirty coolant risks overheating from impaired heat transfer and damaging the engine through accelerated component wear and corrosion over time. It’s best to flush the system at the first signs of contamination.
Will dirty coolant cause overheating?
Yes, dirty coolant that is sludgy or contaminated cannot efficiently regulate the engine’s temperature due to restricted flow and heat transfer surfaces. This can potentially cause the engine to overheat under heavy loads or hot weather conditions.
Final Verdict
Neglecting regular coolant flushes allows harmful sludge deposits to build up over time inside the radiator and cooling system.
This severely impairs the coolant’s ability to effectively regulate the engine’s temperature and protect internal components from corrosion.
Dirty coolant is likely to cause overheating, accelerate wear, and lead to expensive repairs if not addressed promptly through flushing.
Proper coolant maintenance is strongly recommended to prevent engine damage and reliability issues down the road.

Hi, Michael Williams here. I have always loved everything with an engine. After earning my degree in automotive engineering, I spent 5 years testing vehicles for a major manufacturer in Illinois. Now I am using my technical skills to review the latest models online and help others troubleshoot their engine problems with effective solutions.