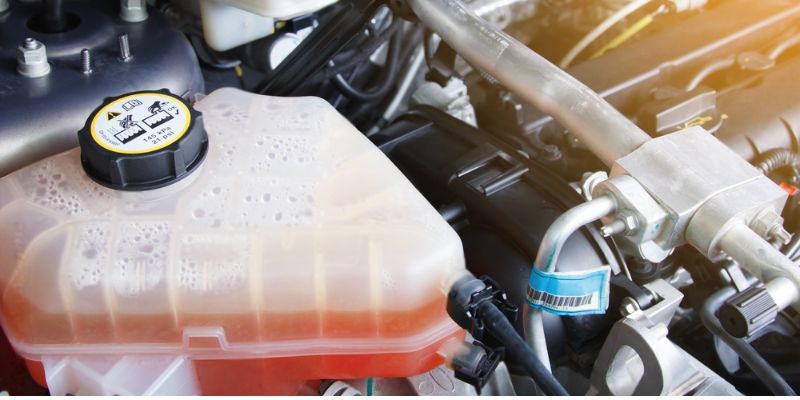
Have you noticed your engine coolant reservoir suddenly foaming or bubbling recently? This troubling symptom indicates air may contaminate the vehicle’s closed cooling system.
Even small pockets of air disrupting this flow can negatively impact engine temperature regulation. Over time, unchecked air infiltration may allow dangerous overheating to occur.
This article will explore the key signs of air intrusion revealed through coolant bubbling. Additionally, we will discuss the causes of coolant bubbling in reservoir and all procedures to diagnose the presence of air pockets in coolant and fix these air pocket issues and the potential cost to fix them.
Why are bubbles in the coolant reservoir?
Coolant bubbling indicates air has infiltrated into the cooling system. The three main ways air enters are through head gasket failures, cracks in major engine components, and loose radiator caps losing pressure seal.
This allows air to seep into coolant passages. Air becomes dissolved but precipitates out as bubbles during heating and agitation.
Bubbling symptoms serve as an early warning that something is compromising cooling circuit integrity before overheating occurs.
Causes of Air Entering the Cooling System
These are the six most common causes of air bubbles forming in cooling systems:
1. Blown Head gasket
One of the most prevalent sources of air in the cooling system is a blown or faulty head gasket. As one of the prime sealing components between the engine block and cylinder head, the head gasket must withstand tremendous pressures during combustion without failing.
Unfortunately, prolonged high heat and mechanical stresses inevitably cause even robust gaskets to degrade over time.
A blown head gasket then permits combustion gasses, pressure, and coolant to bypass the intended flow routes, introducing troublesome air into places it should not be.
Aside from bubbling coolant, a blown gasket often triggers overheating and causes coolant and oil to contaminate one another – making a timely repair essential.
2. Crack in cylinder head/block
Like head gaskets, cracks can potentially develop in critical engine castings such as the cylinder head itself or engine block through similar wear-and-tear over the years of use.
Thermo-mechanical fatigue from fluctuating temperatures and combustion pressures exerted on thin-walled passages render even ductile metals prone to fracturing.
Internal cracks cannot be seen during routine inspections, so coolant gurgling or lower-than-expected coolant levels provide some of the only observable signs of this insidious problem.
Comprehensive leak-down testing helps diagnose such failures before severe and expensive damage results from infiltrating air.
3. Loose/worn radiator caps
As the interface between the pressurized cooling system and the atmospheric environment, radiator caps perform a vital role in preventing air entry. Their primary function is to seal in systemic pressure which creates higher boiling points for optimum cooling performance.
However, caps degrade just like any other component with age and use. Worn or loosened caps can no longer form an airtight barrier, compromising the pressure differential that normally repels outside air.
The result allows ample opportunity for air to be sucked back into coolant passages when caps fail to fulfill their critical pressure-retaining task.
4. Failing water pump
The water pump circulates the all-important coolant through the system and is another common root of coolant gurgling indicators. As the circulatory workhorse, water pumps may seize, leak, or simply weaken over 100,000 miles of operation.
Failing pumps can no longer generate the vigorous flow rates needed to sweep air bubbles and prevent stagnation. With reduced flow, air pockets already dissolved in coolant suddenly become troublesome bubbles again.
Pumps may also begin leaking internally, introducing air directly through weakening seals and housings. Proper maintenance and replacement of worn pumps sustain adequate convection needed for effective heat transfer.
5. Air pockets trapped during fills
As fresh coolant is poured into the reservoir, care must be taken to slowly fill along the side walls to prevent air from becoming surrounded and isolated below the coolant level.
Any air pockets simply displaced in the reservoir will inevitably be drawn back into the cooling passages as coolant circulates. Over time, high pressures within the system can force initially dissolved air back out of the solution and form troublesome bubbles.
Taking a few extra minutes to fill the reservoir and radiator, along with running the engine to flush out air via the upper and lower hoses, helps ensure a continuous column of coolant without air gaps. Neglecting these filling details sets the stage for bubbling and aeration issues to gradually develop.
6. Damage to hoses/connections
No cooling system is invulnerable to the eventual degradation of rubber hoses and seals over extended operating hours. Hoses designed to last 100,000 miles or more will ultimately perish when continuously exposed to heat cycles and vibration stresses.
Cracks in hoses allow entrapped air to mingle with coolant streams and oxygenate the entire flow path over time. Meanwhile, worn clamping connections risk loosening along with older O-rings and gaskets.
Any disrupted seals pose an opportunity for air seepage at the numerous joints tying various components together. Unfortunately, brittle or leaking hoses are not always obvious during routine fluid checks.
Signs of air bubbles in the coolant system
Here are the main signs of coolant bubbles in the reservoir:
Visible Bubbling or Foaming
The most obvious sign is visible bubbling or foaming occurring within the coolant reservoir or expansion tank.
Trapped air will agitate the coolant, reducing its normal clarity and causing it to appear excessively turbulent on the surface. The bubbling may appear steady or intermittent depending on how much air is present and where it is entering the system.
Fluctuating Coolant Levels
As the engine warms up, air pockets dissolved in the coolant will precipitate out, pushing air up and out of the system. This causes the coolant level in the reservoir to rise as pressure increases and also interrupts the coolant circulation.
Owners may need to top off levels more frequently than normal due to the expanding air taking up space in the cooling loops.
Higher Temperature Readings
The infiltration of air inhibits the coolant’s ability to absorb and transfer heat efficiently. This allows engine temperatures to exceed normal operating ranges. A reader may display lower than actual temperatures due to air insulation within the system.
Steam From Reservoir or Radiator
As air is pushed out by pressure, it may appear as visible steam escaping through the coolant overflow bottle or radiator during and after driving. The steam is caused by the rapid boiling and condensing of coolant as it circulates.
Loss of Coolant
As air continuously mixes with the liquid coolant, it displaces the actual volume of fluid circulating through the cooling passages. Over longer periods, this cumulative effect from ongoing air infiltration can manifest as a noticeable drop in the overall coolant level contained within the system.
Refilling may be required more and more frequently to compensate for the air’s invisible yet volumetric replacement of the coolant. A coolant shortage developing gradually is a red flag that air is leaking in somewhere and needs resolution.
Effects of Air Bubbles on the Cooling System
The presence of air bubbles in the cooling system can cause multiple problems such as overheating and need to be addressed as you observe a sign of the presence of air bubbles in the system.
Here are four major effects of air bubbles in a coolant system:
Reduced Heat Transfer Ability
By displacing some of the coolant, air bubbles decrease the amount of liquid available to absorb heat from the engine. This impairs the cooling system’s primary function of efficient heat removal.
Higher Operating Temperatures
With less efficient heat transfer, all engine components like the cylinder head, block, and oil will reach higher temperatures than intended under a given workload. Overheating can damage seals and gaskets over time.
Increased Component Wear
Sustained higher temperatures place greater thermal stress on materials like engine bearings that rely on efficient cooling. This accelerated wear can potentially shorten the lifespan of expensive internal parts.
Potential for Overheating
If air pockets become excessive, the cooling system’s ability to reject heat is overwhelmed, allowing dangerous overheating to occur suddenly. Overheating can cause serious problems like cracking heads or an oil breakdown.
Diagnosing the Root Cause of Coolant Air Bubbles
There are many methods to diagnose the root cause of forming air bubbles in coolant but these three are most effective to diagnose the cause of coolant air bubbles.
Coolant tests
To perform the coolant system pressure test:
- Locate your pressure tester kit. It will come with instructions, but I’ll guide you through it.
- First, you need to drain some coolant from the radiator to allow for the connection of the pressure tester.
- Attach the threaded end of the high-pressure hose to the radiator filler neck. Make sure it’s tight.
- Attach the other end of the hose to the tester gauge securely.
- With the engine cold, turn the pressurizer knob to build pressure in the system until the gauge reads 15 psi.
- Now start the engine and let it reach the normal operating temperature. This will warm the coolant and fully pressurize the system.
- Once up to temperature, turn off the engine and watch the gauge closely. It should maintain pressure for at least 10 minutes.
- If you see a consistent drop of more than 4 psi in that time, it indicates a leak path for air to enter the system.
- Smaller gradual drops point to a less severe issue like a marginal radiator cap.
- Take notes on any leaks so you know where to inspect components for the source.
Pressure/leak-down tests
Here are the step-by-step instructions for performing a pressure and coolant leak-down cooling system test:
- Drain some coolant from the radiator to allow access to the test equipment.
- Connect the high-pressure hose from the pressure tester to the radiator filler neck. Tighten securely.
- Connect the other end of the hose to the pressure gauge on the tester.
- With the engine cold, begin pumping the pressurizer to build pressure in the system.
- Pump until the gauge reads 15 psi and stop pumping.
- Crank the engine and allow it to reach normal operating temperature.
- This will fully pressurize the coolant lines and heat all components.
- Once up to temperature, turn off the engine and immediately start the timer.
- Watch the gauge closely for any pressure drops over 10-15 minutes.
- A drop of more than 4 psi in the time period indicates a leak.
- Isolate the cooling passages one by one with plugs to find the problem area.
- Take note of any leaks detected to know where to inspect components.
- This test methodically identifies the source of air getting into the system.
Visual inspections
- Start by inspecting hoses and clamps closely, and squeezing hoses to check for bulges or cracks.
- Remove the radiator cap and look inside the radiator neck and reservoir for cracks or damage.
- Inspect all gasket sealing surfaces like the cylinder head and intake manifold for cracks or warping.
- Check around head bolts for swelling, traces of seepage, or leaks developing in the gasket.
- Look at oil for a milky color coolant since a bad head gasket can cause oil to enter the coolant.
- Inspect other components like the water pump and diagnose thermostat housing as well.
Fixing the coolant bubbles through Repair and Flushing Procedures
Here are the steps to fix coolant bubbles by replacing specific cooling system components and flushing the coolant system:
- Head Gasket Replacement
Remove the cylinder head and inspect for warping or cracks. Clean all gasket surfaces thoroughly. Install the new head gasket using an approved torque sequence. This seals a major source of air entry.
- Water Pump Replacement
Remove all drive belts and drain the coolant. Take off the old water pump and inspect the housing. Install the new water pump with fresh seals and gaskets. Proper pump function improves circulation.
- Radiator Cap Replacement
Inspect the radiator cap valve and gasket for damage or corrosion. Replace with an exact OEM cap rated for the system’s pressure. The cap properly seals the system to maintain pressure.
- Radiator and Cooling System Flushing
Use a garden hose or flushing machine to clean out debris from radiator cores and engine passages. Flushing removes contaminants that reduce heat transfer properties.
- Filling with Proper Coolant Mixture
Once components are replaced, refill the cooling system with fresh coolant premixed to the manufacturer’s specifications. This protects the system from corrosion to prevent future leaks.
Can a bad thermostat cause bubbling in the coolant reservoir?
Yes, a malfunctioning thermostat can contribute to bubbling in the coolant reservoir. The thermostat plays a crucial role in regulating the flow of coolant through the engine.
If the thermostat is stuck closed, it can lead to overheating. As the coolant heats up, pressure increases, causing bubbling or boiling in the reservoir.
Additionally, a faulty thermostat may trap air in the cooling system, leading to erratic behavior and air bubbles.
If you notice bubbling in the coolant reservoir, it’s advisable to check the thermostat, along with other components, to address the issue promptly and prevent potential engine damage.
Can a bad water pump cause bubbles in the radiator?
Yes, a faulty water pump can contribute to the presence of bubbles in the radiator. The water pump is responsible for circulating coolant through the engine to regulate temperature.
If the water pump is failing, it may not circulate coolant effectively, leading to localized overheating. This localized overheating can cause the coolant to vaporize and form bubbles in the radiator.
Additionally, a malfunctioning water pump can create air pockets in the cooling system, contributing to the presence of bubbles.
If you observe bubbles in the radiator, it’s essential to inspect and address potential issues with the water pump to prevent further damage and maintain proper engine cooling.
Does bubbling coolant always mean a blown head gasket?
While bubbling coolant can be a symptom of a blown head gasket, it doesn’t always mean that bubbling coolant is the issue of a blown head gasket. Bubbling in the coolant system can be caused by various factors, and a blown head gasket is just one of them. Other possible reasons for bubbling coolant include:
- Air Pockets: Air trapped in the cooling system can cause bubbling. This may occur during coolant replacement or due to leaks.
- Faulty Thermostat: A malfunctioning thermostat can disrupt the normal flow of coolant, leading to overheating and bubbling.
- Coolant Boiling: Overheating of the engine can cause the coolant to boil, creating bubbles. This can result from issues like a malfunctioning water pump or a clogged radiator.
- Radiator Cap Issues: A faulty radiator cap may fail to maintain the correct pressure in the cooling system, leading to boiling and bubbling.
While a blown head gasket is a serious concern, it’s important not to jump to conclusions based solely on bubbling coolant. If you observe this symptom, it’s advisable to conduct a thorough inspection or seek professional assistance to diagnose the specific cause accurately.
Cost to fix coolant bubbling
The potential cost to fix coolant bubbling in a vehicle can vary based on the specific issue and the cost of parts and labor in your location. Here are rough estimates for common repairs:
- Diagnostic Fee: $50 – $150 (may vary by location and shop).
- Thermostat Replacement: $100 – $200 (parts and labor).
- Water Pump Replacement: $150 – $300 (parts and labor).
- Head Gasket Repair: $1,000 – $2,000 or more (parts and labor).
- Coolant Flush: $50 – $150 (parts and labor).
- Radiator Replacement: $200 – $500 (parts and labor).
These are general estimates, and actual costs can vary. It’s crucial to get a specific quote from a reputable mechanic after they diagnose the exact cause of the coolant bubbling in your vehicle. Additionally, prices can differ based on the make and model of your car and the local labor rates.
Conclusion
The major causes of air bubbles forming in the cooling system include leaks from worn gaskets, hoses, or other components.
By thoroughly inspecting for leaks, replacing failed parts like the head gasket or water pump, and flushing out contaminants, the root causes of air entry can be addressed.
It’s also important to use the correct coolant mixture, tighten all hose clamps securely, and replace the radiator cap if damaged. Taking these repair steps eliminates pathways for air to invade the cooling loop.

Joseph Morgan has decades of automotive experience. The Detroit native started restoring classics in the 1970s. He owned a vintage repair shop and authored articles for car magazines. With a 1965 Mustang fastback of his own, Joseph now shares advice through his YouTube channel. From engine swaps to rust repair, his expertise helps preserve automotive history.